Depth Sounder
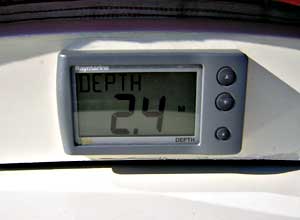
1) The Display
On the Allegro 27 there is a deplorable lack of suitable "dashboard" area for mounting instruments in such a way as to not risking them being rubbed by lines or seated crew, but all the while easily monitored from the helm.
The curved splash guard-cum-sprayhood base moulding across the sliding hatch cover, although rather low-profile for most of its length, is perfectly situated in these respects. At midpoint it "peaks" at 90 mm, so this is where I decided to mount the Raymarine ST40 sounder's digital display, which is squarish and just 70 mm high.
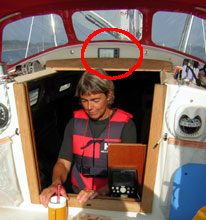
By carefully making some access holes from below (i.e. through tha saloon roof) it was possible to to wiggle the wiring inside the splash guard moulding towards one side and unobtrusively all the way to the bottom area.
2) The transducer
The manufacturer's recommended mounting fashion for the sounder's transducer was through the hull, but like probably most boat owners I dislike the notion of making another potentially troublesome hole, in addition to the already existing ones. An alternative tried and tested method is placing the transducer immerged in an oil-filled tube, which in turn is affixed to the inside of the hull, but this too seemed rather complicated. We don't want the added risk of messy oil leaks, if we can avoid it, do we?
Reading of other people's successful experiments with simply gluing in-hull transducers directly to the inside bottom surface, I decided to try this, although the hull thickness is quite substantial on this type of boat.
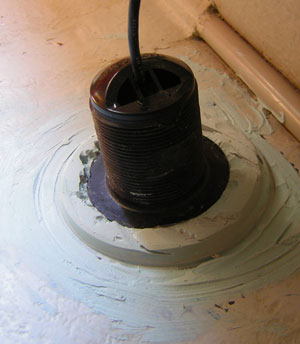
![]() Firstly, the substrate has to be sanded down to the bare GRP, free of paint etc. To optimise the fit between the transducer surface and the hull surface a moulded epoxy base was built up. By using a plastic bowl with the bottom cut out and turned upside down a mould was made for the epoxy to be poured into. The actual transducer was covered in household plastic film and carefully pushed down as far as it could go into the unset epoxy and stabilised. It is very important that all the plastic material (original GRP and new epoxy) is absolutely free of air bubbles, but to actually ensure that there is no trapped air is rather easier said than done!
Firstly, the substrate has to be sanded down to the bare GRP, free of paint etc. To optimise the fit between the transducer surface and the hull surface a moulded epoxy base was built up. By using a plastic bowl with the bottom cut out and turned upside down a mould was made for the epoxy to be poured into. The actual transducer was covered in household plastic film and carefully pushed down as far as it could go into the unset epoxy and stabilised. It is very important that all the plastic material (original GRP and new epoxy) is absolutely free of air bubbles, but to actually ensure that there is no trapped air is rather easier said than done!
When the epoxy was hardened the transducer was be lifted and freed from the plastic film. Finally it was glued to the now perfect cast using silicone. In this way it is possible to remove it in the future for repairs, etc, and bed it in again. Some people opt to simply epoxy the transducer fast to the hull for good, but that way you will never get a second chance.
Another consideration is the angle at which the transducer's super sonic signal is aimed. Ideally an echo sounding device should be mounted perfectly perpendicular and sufficiently far from the keel in order to give correct and undisturbed soundings. As ours is a long-keeled hull, there is no area of the hull surface to be found which is perfectly horizontal. Furthermore the area with the least "tilt" is only 300-400 mm away from the hull's centre line!

![]() The compromise I opted for was to place the transducer on a surface with approximately 20 ° from the horizontal but tilting it on the epoxy base so that the the resulting echo beam centre was 10 ° off from perpendicular. This results in a theoretical misreading of only 1.5% at no heeling angle.
The compromise I opted for was to place the transducer on a surface with approximately 20 ° from the horizontal but tilting it on the epoxy base so that the the resulting echo beam centre was 10 ° off from perpendicular. This results in a theoretical misreading of only 1.5% at no heeling angle.
As it turned out, the echo sounder works very well and registers depths down to about 90 metres.
Ekolods-installation
1) Placering av visaren
På en Allegro 27 finns det få lämpliga ytor där instrument kan monteras väl synliga från rorsman plats, men ändå så att de inte är i vägen för olika tampar eller för en besättning som vill sitta med stöd under sprayhooden exempelvis. När kompass, logg och varvräknare monterats på skottet på ömse sidor om nedgångsluckan finns det inte alltså inte mycket att välja på.
Skvättlisten över luckgaraget, vilken även fungerar som bas för sprayhood är visserligen bara 90 mm som högst i mitten, men perfekt från alla andra synpunkter, så det blev där som jag beslöt montera ekolodsvisaren. En fördel med Raymarines ST40-serie är att visar-intrumenten är så kompakta, bara 70 mm höga.
Med hjälp av några strategiskt borrade hål i salongstaket gick det att lirka sladdarna helt osynligt inuti skvättlist-profilen och vidare ner dolt ända till botten under styrbords koj.
2) Montering av givaren
Tillverkaren rekommenderar att givaren (transducern) monteras genom ett borrat hål i botten. Sådana ingrepp vill man ju undvika så länge det går. En annan vanlig, i praktiken likvärdig metod är att montera hela givaren nedsänkt i olja i ett rör som plastats till insidan av botten. Detta verkade ändå krångligare, men är troligen potentiellt mindre riskabelt, bortsett från risken att oljan sipprar ut och kommer på drift bland stuvade persedlar under kojerna.
Jag hade läst om att andra lyckats bra med att helt enkelt limma eller plasta fast givaren på skrovets insida, och tyckte det var värt ett försök.
Först måste förstås glasfiberlaminatet friläggas och ruggas upp. Sedan byggdes en epoxy-kaka med en upp-och-nervänd plastskål utan botten som form. Transducern käddes i glad-pack och trycktes ned i mitten så långt det gick i den fyllda formen och fixerades provisoriskt medan epoxyn härdade.
Det betonas i arbetsbeskrivningar för denna metod hur viktigt det är att plasten blir verklig homogen och utan inbakade luftblåsor, så detta måste man försöka tänka på. I praktiken är det förstås inte så lätt att kontrollera detta innan det är försent.
När epoxyplinten härdat kunde givaren brytas loss med viss möda. Efter att ha befriats från matplastfilmen klistrades givaren tillbaka i den perfekt passande formen med hjälp av ett tunt lager silikonmassa.
En annan sak att ta ställning till är hur givaren riktas. Idealet är naturligtvis om den kan monteras helt lodrätt i ett läge där den inte störs av reflektioner från kölen. Men Allegrons skrovform ställer till vissa problem här. För det första finns det ingen helt vågrät yta (där givaren alltså skulle monteras dikt vinkelrätt) på hela undervattensskrovet, och för det andra så befinner sig de "mest vågräta" områdena helt nära kölen (ovanför "spunningen" om man kan säga så på en plastbåt).
Kompromissen blev att placera givaren under styrbords koj enligt bild med en vinkel på cirka 10° i relation till bottenytan (som här är cirka 20° från vågrätt), vilket resulterar i en vinkel i förhållande till havsytan på ungefär 10° när båten inte har någon egen lutning. Teoretiskt ger detta en felregistrering på 1,5%, alltså helt försumbart. Hela installationen visade sig fungera som önskat och registrerar djup ner till cirka 90 meter innan ekot blir för svagt.
Slutligen byggdes en plywoodlåda kring givaren för att skydda mot törnar.