 An RPi web server in my bookshelfI set this little web server up basically so that I could continue to host my personal web pages for free. This simple site was ”launched” in 1996, the year we got our first modem and residential internet connection, and over the years it has been hosted by a couple of different ISPs as a ”bonus” part of their service plan. Well, the last one decided to close down all web hosting all of a sudden. In other words, it was time to go DIY again! The Raspberry Pi chosen for this project is the model 2B. That is not the most recent and powerful model, but even so totally sufficient for this task. The site uses only static pages, very few large image files, generally only basic html and css, and no php at all. So the workload is very light by modern web standards. Nginx for Debian was choosen as the server software, running on top of the Rasbian OS, and I am very impressed by how easy nginx was to setup and deploy. The real challenge comes with the server hardening part: all the configuration and customization needed to set up a truly secure machine, one which can be safely left unattended despite being exposed 24 hours a day all year round to the numerous malevolent and potentially dangerous agents lurking on the internets. [Pretty poetic, that was.] In fact, when first starting up a web server it is litterally only a matter of minutes before the first routine penetration attempts knock on the door (port 80)! It's a tough web out there...So the strategy must essentially be to safeguard against all possible kinds of attacks by using all ”state-of-the-art” tools you can find (and then learn how to use them). A probably inadequate list of such (free) hardening tools and utilities may include the following items (but you’ll have to do your own research, and decide which to employ, and figure out how to configure them): -- Backup... always backup after every configuration change that seems to work. -- Change the default username <pi> to something less obvious. -- Change the default password to anything else (cannot be a palindrome, though). -- Set up a fixed IP on LAN -- Make your WLAN's IP fixed too (if it's dynamic and if your ISP lets you do so). -- Enable SSH access with key based authorisation + passphrase. -- Disable root-login via ssh. -- Close port 21 and 22 from the internet. Leave only standard WWW port 80 open through the firewall. -- Configure the default SSH port 22 to be some (much) higher random number. Of course, this number also has to be known to the computer you use to access the web server via SSH. -- Install the DenyHosts tool. -- Install, deploy and configure fail2ban. -- Set "server_tokens off" in /etc/nginx/nginx.conf. -- Deny execution of scripts inside certain directories. -- Block Referral spam. -- Deny all user-agents, bots or web-scanners that may attack your server. -- Block any particularly nasty robots. -- Have a look into ”Control Nginx Simultaneous Connections” and ”Control using limit_conn directive”. -- Check for rootkits. -- Do a ”sudo nmap -v -sS -p1-2000 localhost” once in awhile to check status of (at least) your first 2k ports. -- If you don’t have the experience, you should probably seek advice on how to edit the ufw-rules. -- When everything is tested and has been running stable for a convincingly long time, routine logging to /var/log/ufw.log kan be turned off. This is in order to reduce wear, by minimizing unnecessary writing to disc (sd-card). -- And did I mention to backup? Finally, to add both extra responsiveness and ultimate security, the web server can be configured to run completely in RAM, and hence never read or write to disk. The procedure is to (automatically) create a virtual RAM-disk on start-up onto which the entire website is simply copied from the sd-card. This means the content will always be loaded fresh and untarnished on a reboot. This was the route I choose for my server, and everything just works without any hiccups as far as I can tell. There is a definite improvement in (perceived) performance, with latency hardly noticeable when loading the pages from an external web browser. This is how you can replicate this miniscule (physical) server in 5 easy steps: 1) Find a nice looking tin box with just the right dimensions. 2) Stuff a Raspberry Pi in it (any type, but newer is nominally better I guess) 3) Poke a multitude of pin-holes in the lid for ventilation, and two larger slits for power and LAN cables. 4) Attach said cables. Close the lid, and plug it in! 5) Load the RPi with all the suitable software (as summarized above), configure it, and upload some web content to serve. By the way, the URL to the bookshelf server that now hosts my venerable site, as well as that of my dad's, is http://xneb.org/ .  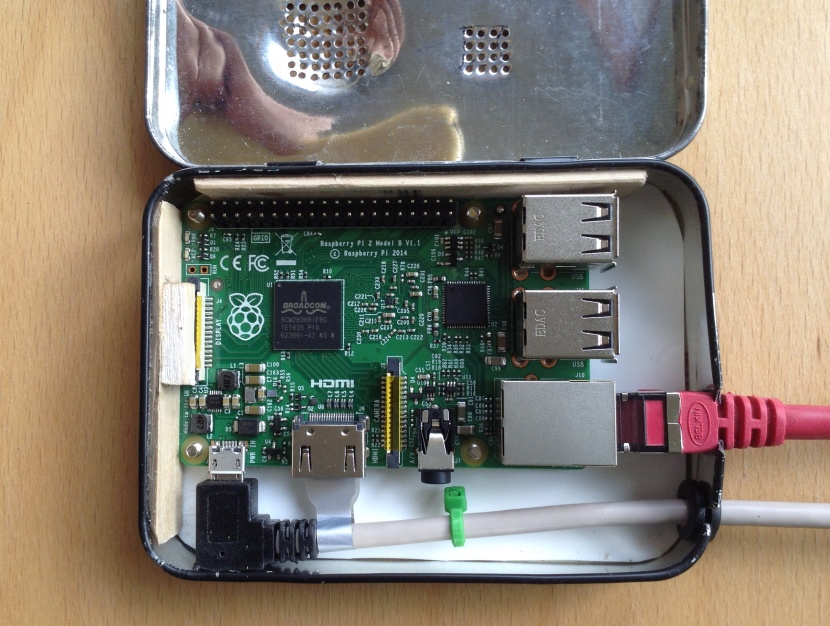 Comments  You may mail me here: xneb.contact@gmail.com  |
 | |